Getting Started
In this article we will give you a quick tutorial to get start within 10 minutes.
Get a Rasberry Pi Pico
Get a Raspberry Pi Pico board or Raspberry Pi Pico2 board or other RP2040 orRP2350 board.
Install firmware
- Download firmware (.UF2).
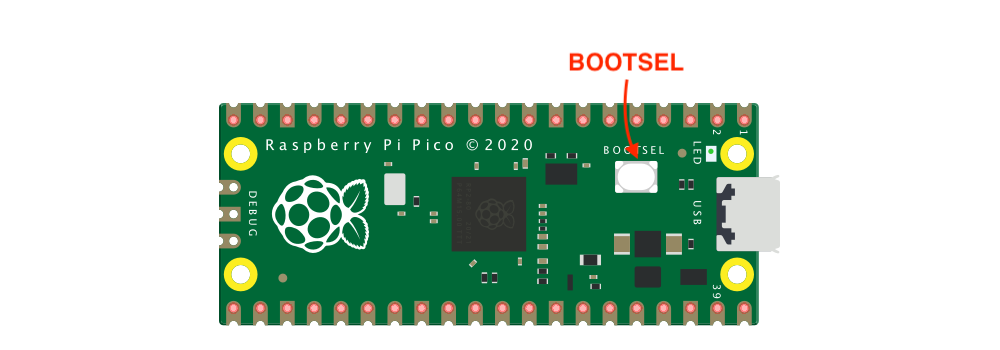
- Push and hold the BOOTSEL button and plug into USB port of your computer, and then release the button. It will mount as USB storage device named RPI-RP2.
- Drag and drop the downloaded .UF2 onto the RPI-RP2 volume. Your Pico will reboot automatically.
Install CLI (Command-Line Interface)
First of all, we have to install Kaluma CLI in your local computer to work with boards Kaluma installed. Of course, it is assumed that Node.js is installed.
$ npm install -g @kaluma/cliAfter installation you can see help message with help command.
$ kaluma helpConnect with Terminal
Once you installed the firmware, you can use the board in REPL mode with any ANSI/VT100 compatible serial terminals. CLI provides a simple serial terminal feature with shell command:
$ kaluma shell

# you can specify a serial port
$ kaluma shell --port /dev/tty.usbmodem0000000000001

# to see all available serial ports
$ kaluma ports
Then you will see a welcome message and the prompt > (If you cannot see the prompt, press Enter several times). On the prompt you can enter any JavaScript expressions or REPL commands. Type .help command, you will see all available REPL commands.
> .helpYou can exit the CLI shell connection by pressing ctrl+z.
You can use other serial terminal programs including screen command in macOS and Linux, or PuTTY in Windows.
Setup project
To create a project, simply make a directory.
$ mkdir kaluma-app
$ cd kaluma-app
We recommend to initialize the project with NPM to create package.json.
$ npm init -yWrite your code
Let's write the first blink code index.js in the project folder with any text editor (VSCode, Atom, Sublime Text, etc).
The very simple code without any external HW component is LED blinking code if your board has on board LED.
pico and pico2 board has on board LED connected to GPIO 25. If your board is officially supported by Kaluma, you can use
board.LEDconstant.
// index.js
const led = board.LED  // board.LED=25 for pico, pico2 board because GPIO 25 is connected to on board LED.
pinMode(led, OUTPUT);
setInterval(() => {
  digitalToggle(led);
}, 1000);
pico-w and pico2-w board has on board LED connected to WIFI module. General GPIO can't control on board LED. This is special on board LED blinking example code for pico-w and pico2-w board only.
// index.js
const { PicoCYW43 } = require('pico_cyw43');
const pico_cyw43 = new PicoCYW43();

// Blink on-board LED
setInterval(() => {
  if (pico_cyw43.getGpio(0)) {
    pico_cyw43.putGpio(0, false); // turn-off LED
  } else {
    pico_cyw43.putGpio(0, true); // turn-on LED
  }
}, 1000);
Flash your code
Use CLI to flash index.js to your board.
$ kaluma flash index.jsAfter uploading successfully, you will see a blinking LED on the board.
Install third-party packages
You can install third-party packages with NPM. You can find third-party packages for Kaluma in Packages.
$ npm install https://github.com/niklauslee/dht --saveThen you can import the package with require().
const { DHT } = require('dht');Bundle multiple files
Please remember that only a single .js file can be flashed in Kaluma. If you are using multiple .js files or using third-party modules installed by npm install, you have to bundle them into the a single .js file.
$ kaluma bundle ./index.jsYou can find bundle.js file and flash the bundled code.
$ kaluma flash ./bundle.jsOr shorty, you can bundle and flash at once with --bundle option.
$ kaluma flash ./index.js --bundleDebug
To check the errors raised during the code execution, you need to connect with serial terminal again. However CLI's flash command will load the code automatically so you can't see the error messages. So you have to use --shell option to flash code with shell connection.
$ kaluma flash ./index.js --bundle --shellThen you can see all console logs and errors because shell connection still alive even after flashing code. Hit ctrl+z to quit.
Sometimes the flashed code can crash the board. Because Kaluma automatically execute the code in flash on boot, you have no way to recover the board in software manner. In this case you can skip code loading on boot by wiring GP22 pin and GND pin (See Skip code loading on boot). Then you can connect with terminal and you can erase the code from the internal flash in REPL mode.
> .flash -e